
 What better thing to share as the first post (ok, officially second) on my new craft blog than a subway art tutorial? Though it's taken me forever to get this together, I am thrilled to share with you how to make your very own custom family art.
This version of subway art took quite a while to complete, and wasn't the least expensive project I've undertaken. However, the results were well worth the time and expense. Hopefully you have many of these supplies sitting in the garage already.
Supplies needed
30 x 40 piece of wood (pine preferred)
140 inches of pine board (1.5 by 1 inch)
wood glue
staple gun/staples
mitre saw (a mitre box with saw would work as well)
drill/nails
wood filler
sander
spray paint - primer, ivory, black, red, yellow (you can substitute whatever colors you chose, but these are the colors I will refer to for this tutorial)
cardstock
brayer roller (optional)
ruler/pencil
small sharp scissors
painters tape
Whew. That's a lot. Remember....it's worth it.
Let's get started:
Begin by making the board. Have the local hardware store cut your wood board to 30 x 40 inches. Of course, you can make this subway art sign whatever size you like. But these are the dimensions we'll use for this tutorial.
Make the frame for the board. Cut the 1.5 x 1 inch pine board according to the dimensions of your subway art board. Cut the edges at a 45 degree angle. Measure twice, cut once. You will cut 4 pieces total: two 40" pieces and two 30" pieces.
Tip: If using an electric mitre saw, remember to cut just outside the line you mark. The width of the saw itself must be taken into account when cutting. It's always better to cut it too long than too short.

After each cut, make sure the angle fits exactly with the adjacent board.
Tip: After you cut one side, use that cut board to measure out the length of the next board (see picture below).

It's also a good idea to avoid cutting off your fingers while using the mitre saw. Thankfully, there is a reminder on my mitre saw in case I forget:

After you cut the 4 pieces, it's time to glue, staple, and nail them to the board. Start with the wood glue. Using a waving design (as my hubby here has been coerced into doing), glue the length of the board as well as the sides where the corners will meet. Attach to the subway art board.

Next, for good measure, staple the corners of the boards together.

Next, turn the board over *carefully* and drill 3 nails around the edges of the subway art board.

It should look like this:

Fill in the holes made by nails with wood filler. It may take two or even three times to make sure the holes are completely covered.

Sand the subway art board two times to smooth it out. Next, prime it with the spray paint primer. Then, paint the board twice with the ivory spray paint, allowing it to dry in between coats.
Hang in there...you're getting there!

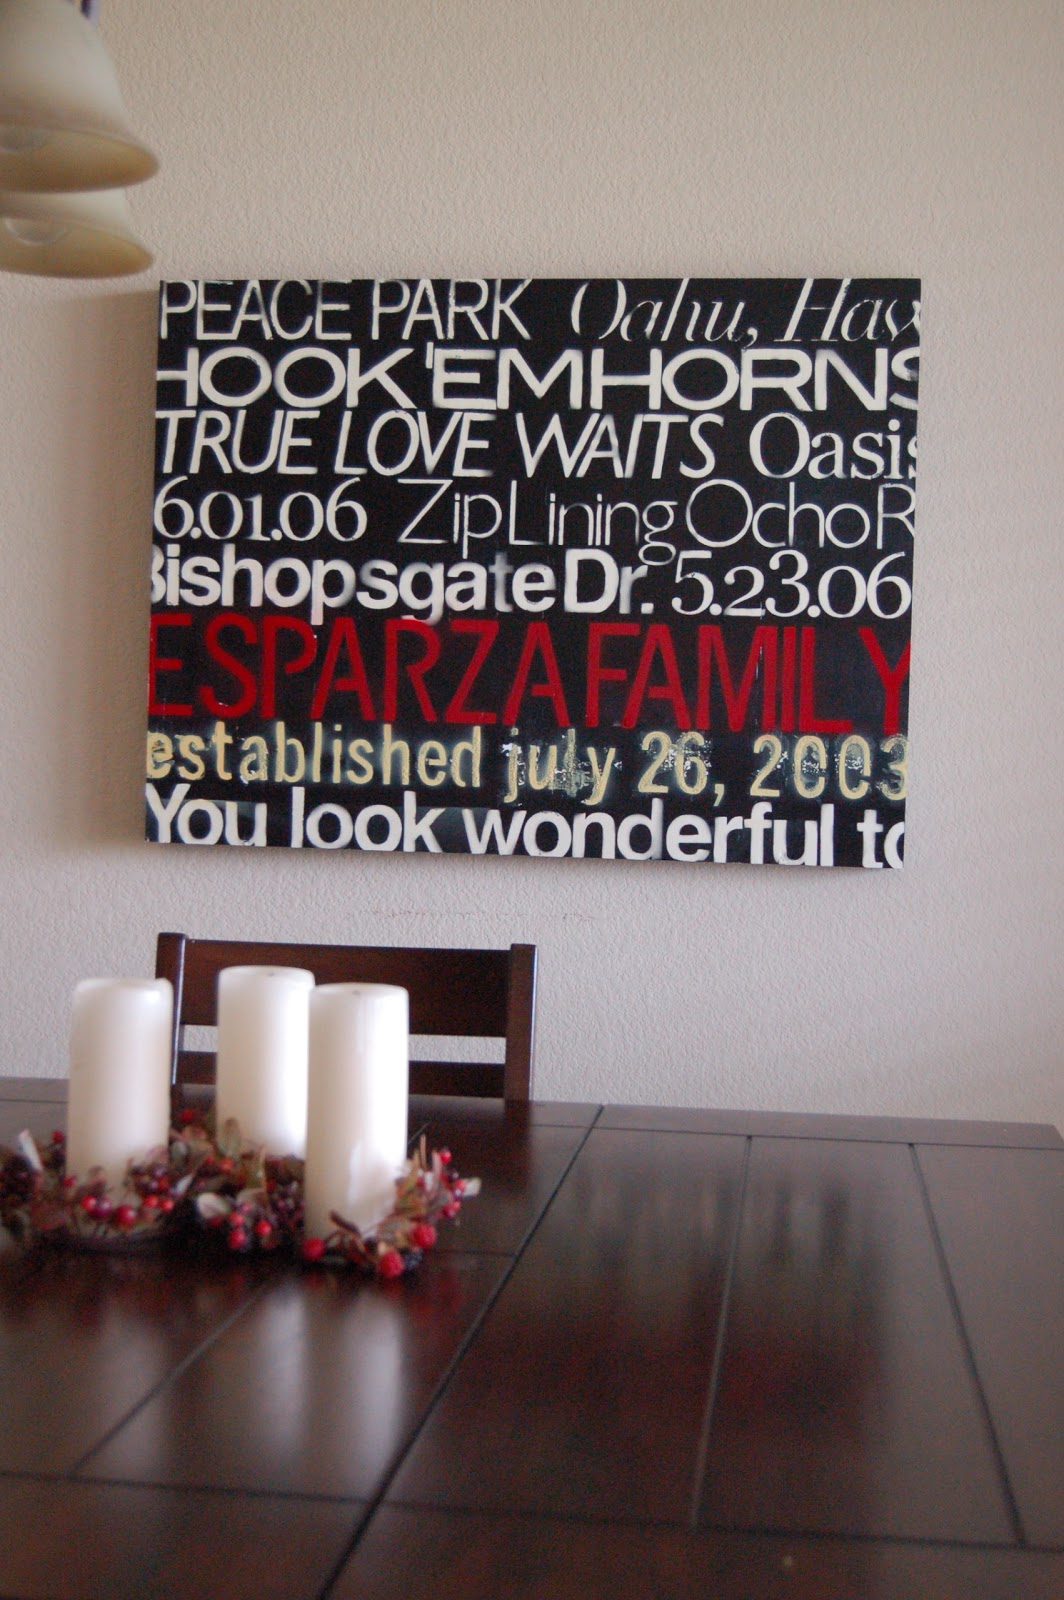
After you have made the board, you will have to use a photo editing program to figure out how you want your subway art to look. I use GIMP, which is a freeware very similar to Photoshop. Use different fonts to make each set of words stand out from the next. Put some phrases in bold and italicize others. Use words from places and times and people that are important to you. In this example, we will put your family name and wedding date (or baby birthday or whatever date you chose) in different colors.
Since we have 8 lines of wording, each line will be about 3.75 inches tall. Use a word document software (Word, TextEdit, etc) or the same photo editing program to print out the letters you need for each word (in the different fonts). Make the letters about 3.5 inches tall.
Print the letters onto your cardstock. Do NOT print out the letters of your family name and date yet (the words in red and yellow bellow).

Using the spray adhesive spray, glue each paper of letters or phrases to the contact paper. Using very small scissors, cut out each letter from the contact paper. This is the most tedious part of the project. I recommend sitting down in front of a movie (or two...or three) while you do it.

Using a ruler and pencil, draw lines diving the subway art board into sections 3.75 inches wide.

Before removing the back of the contact paper, place each letter or set of words in place to make sure it fits where you want it. Place the letters just above the lines you drew.
Tip: Try placing parts of the words so they hang off the board to give it that "I stole this art off a vintage subway wall in New York City" feel.

After you have each word where you want it, remove the backing of the contact paper and stick it on the subway art board.

Use a brayer roller to make sure the letters are stuck on well.

Once the letters are all stuck in place, spray paint the top and sides of the board with black. Spray slowly and evenly making sure it doesn't drip down the sides. Let it dry completely.

After the black paint has completely dried, remove the contact paper letters. Or, if you're really lazy, you can let a toddler do it for you.

You're SOOO close to being finished! This is what it should look like at this point:


Next, print out the letters of your family name and date onto the cardstock. Make the letters a little larger, about 3.75 - 4 inches. Do NOT glue it to the contact paper. Use a ruler to mark 1 inch below each letter. This will insure that the wording will be straight (since you can't draw a line like last time).
Make a stencil by cutting out each letter. For letters that have spaces enclosed (like R or P or D) be sure that you DON'T cut out the part that encloses the space.

Using the painters tape, make a straight line across the subway art board roughly 3.75 inches from the bottom. The top of the painters tape should be where the bottom of the stencil letters will go. Tape the stenciled letters in place, starting with the date, not the Family name. If possible, over lap it a little with the letters below it just a bit.

Using old towels or sheets, tape off the rest of the subway art board so that only the stenciled letters are showing. Spray paint the date with yellow spray paint. Use two or three coats depending on how bright you'd like it. Use caution not to let the yellow paint drip down the sides.
Tip: You may have to use your fingers to hold down the template so that the pressure from the spray paint doesn't lift it up during painting. You may want to put on latex gloves.

You can allow the paint to dry in between coats. Or, if you'd like a more agged look (like below), try spraying each layer on thickly and without much drying in between.

Repeat the same steps for the family name. Paint the name with red.

Let the red paint dry...and you're finished!
Now the only thing left to do is to strip your kiddos down, stick them in front of your hand made family subway art, and take lots of funny pictures!


This is awesome! I totally want to do this when I get some time. That will be...[checks fake watch]...never. But I WANT to do it!
ReplyDeleteTwin Spinner, thanks for your comment! How cool that you have a fake watch. Where did you get it? I'd love to get one so I could use it the next time my hubby asked me, "Babe, when are you going to wash those dishes?" :)
ReplyDelete